Showing posts with label craft. Show all posts

Clean cup, clean cup. Move down.

Wednesday, September 14, 2011

Walmart has flower pots shaped like giant teacups. Walmart has flower pots shaped like giant teacups. This is exciting because 1) I love teacups, and 2) I love things in sizes that they are not usually in.

So of course I bought one.


It's obviously a ridiculous thing to buy, so I almost didn't... but then I did. Because, when you have the opportunity to turn a large-sized teacup into a small-sized Disneyland teacup, you do it. So I did, and so should you.

This project is fairly simple, if not a little time-consuming. I just did a little bit at a time, over several days, since there's a lot of waiting for paint to dry between coats. With all the coats you have to do, trying to do this in one day, I imagine, would be very frustrating. Also, being that it's fairly easy to copy, I'll try to keep the steps brief.

Materials
  • a teacup
  • a teacup design
  • spray paint in your base color (I used white)
  • acrylic paint in the other colors
  • paint brushes
  • a compass (not the directional kind)
  • painter's tape
  • glossy spray-on sealer

Steps
1) Spray your base coat in several thin layers, letting the layers dry in between coats. If you try and do one thick layer, you will have drips of paint all over the thing. I did four layers.

2) If your inside is a different color than your outside, paint the inside. If not, skip this step.

3) Paint the saucer, the rim of the cup, and handle. There are a few ways to get straight (well, circular) lines around your cup: to draw lines on the saucer, I used a compass (first picture); to draw the line around the inside rim, I used a compass a slightly different way (fourth picture); to get a nice, crisp line around the outside rim, I made pencil marks 1/2" from the top, and used those to guide painter's tape around the outside (second and third picture). I did between two and five coats on these parts.

4) Tape off (or use the compass to draw guidelines) the second line around your cup and paint it. Be careful with metallic paint--it tends to dry rubbery, and can peel off easily. In fact, I might recommend you draw lines with the compass, rather than tape it off; I had some difficulty with the tape. I did five coats here.

5) Trace on your pattern and paint it. You can use my stencil if you'd like, or create your own. I just printed it on regular paper, and cut off each heart after I traced it.

6) After it's completely dry, spray it with some kind of glossy outdoor-appropriate sealer. One coat should be fine; I did two just to be safe. When it's dry, it's done!


After mine was all dry and done, I planted some junk mail from Google in it. Yup. I'm excited.

Sailor Moon Week Day 3: Swag

Wednesday, September 07, 2011


My craft space looks like it was hit by something hurricane-like... maybe a pack of kindergarteners. I've been crafting my alabaster buns off, and, as part of Sailor Moon Week, have a few Sailor Moon themed crafts I'd like to show off.

[link]
I found some Sailor Moon paper dolls and knew I had to use them for some kind of craft, so  I went with magnets. They're made with shrink plastic, so they're thick and durable. I really like how they came out! In fact, I've been looking for more paper dolls to make similar sets.

[link]
For the longest time, I wanted a Cosmic Heart Compact necklace. But a very small one. It took me a few tries to get it right, but I think I've got the hang of it! I made one for me, and an extra for my Etsy store.

It's on a nice long chain, so it falls right where it does on Usagi. I also sprayed it with acrylic, to make it shiny.
[link]
These earrings were a lot of work! I drew the Cosmic Heart Compact for the Sailor Moon tattoo set that I posted yesterday, so that was already done, but I couldn't use the same bow because someone else had drawn it, and you can't just use someone else's art for your craft like that, so I had to re-make all the bows. My right index finger is all torn up from making these, but they're kind of awesome so whatever.
I'm not the only one making Sailor Moon swag though! There's lots of handmade stuff from Etsy. I know this because I looked through all of it. Well, everything that comes up when you search for "Sailor Moon" under "handmade." I picked my favorite fifteen things (plus that necklace I made, ahem) and made a treasury.

[link]


A lot of my stuff is boxed up since Poncho and I are in a semi-temporary living situation, but I've had a really hard time resisting the urge to dig out my Moon Kaleidoscope and gashapon and the like. I miss my Sailor Moon swag... and look at all that neat stuff for sale on Etsy, handmade by fans. Argh, temptation.


logo by Bleuette | Sailor Moon image by 朱雀町四丁目

This is Halloween[-ish]

Wednesday, October 13, 2010

I love Halloween! It's, like, the only holiday where you can have a party and aren't expected to spend time with your family. And you get to wear a costume, which I love.

Unfortunately, I don't have many Halloween decorations.

So I made some.

Perhaps other people would like to make some too.

Halloween Lanterns~!

I know, my setup is very Halloween-y.
You will need:
1) cardstock - one sheet per lantern
2) vellum - one sheet per three lanterns
3) electric tea light candles
4) scissors
5) exacto knife
6) cutting mat
7) pencil
8) glue stick
9) the lantern pattern - get it here

Step 1:
Print the pattern, cut it out, and trace it onto the black cardstock. I used white cardstock so that (a) the stencil would be sturdy, and (b) I can use the stencil to make another lantern when I'm done.

Step 2:
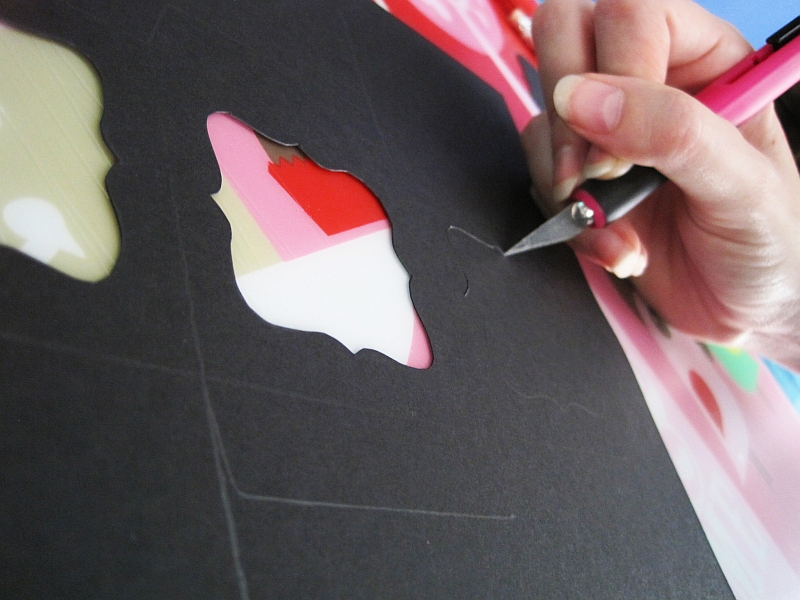
Cut it out. A sharp exacto blade will make all the difference here. If your blade doesn't cut the paper with little effort from you, do yourself a favor and buy some new blades.


Step 3:
Score the fold lines. Score the fold lines. Really, it'll make the folds cleaner and easier.

(Psst, "score" means you scratch it, like with scissors.)


Step 4:
Find some images for your vellum windows. You're going to want to shrink and crop them down to 2"x2". Karen's Whimsy, The Graphics Fairy, and Google Images are all good places to find graphics for your lanterns. You can also download the images I used for my lanterns here. The file is in Microsoft Word format to (hopefully) make it easier to drop in your own images. The images are from a scrapbooking collection entitled Ravenhead Manor.

Anyway, print them out, cut them up, and glue them to the inside of the lantern windows.

Step 5:
Fold it up, glue the tabs, and drop in one of those battery-operated tea light candles. Close the top and it's done!
Finished~!

Alternatively, you can make an open-top version that can hold a real tea light candle. Though keep in mind that you're putting a flame inside paper, so don't leave them unattended.

You can get the open-top pattern here.


Or, if you are feeling so inclined, you can fill it with treats!


To review, here are the files available for download:
pattern for the closed-top lantern
pattern for the open-top lantern
sample vellum windows

I Aim to Misbehave

Wednesday, September 22, 2010

As a never-ending dabbler, I have started... dabbling... in cross-stitching. It's one of the better crafts, I think. It starts out on the computer, where I create the pattern, and ends with me sitting in front of the TV, stitching away. The embroidery hoop is portable and the results are cute. And there are endless possibilities to incorporate my geekery into my patterns.

Speaking of geekery, who doesn't like Firefly? And Serenity, obviously. I don't know anyone who's seen the series and movie that doesn't love it. And by "love" I mean love. With emphasis.

So I made a Serenity cross-stitch. I think it's pretty sexy.


"Y'all got on this boat for different reasons, but y'all come to the same place. So now I'm asking more of you than I have before. Maybe all. Sure as I know anything, I know this - they will try again. Maybe on another world, maybe on this very ground swept clean. A year from now, ten? They'll swing back to the belief that they can make people... better. And I do not hold to that. So no more runnin'. I aim to misbehave."
- Malcolm Reynolds, Serenity

The pattern comes out to be 4"x6" on a standard 14-stitch-per-inch fabric. I used six-strand embroidery floss when I made it. The pattern comes in GIF, PDF, and PCStitch formats.

Scanography

Friday, September 17, 2010

I have recently discovered scanography. It's a bit on the side of ridiculous, sticking things on your scanner and calling it "art," but I kind of love it. Something about the eerie colors and odd focus makes the resulting images look deliciously macabre, even if a lot of it is people just mushing their faces against the glass like our mothers did with their bottoms in the 80s when no one else was in the copy room.

Timur Akhmetov and Yulia Yukashova, of Russia, started a project called Face Your Pockets where, basically, you empty your pockets and/or purse onto the scanner, put your face in there, and hit Scan. Between the voyerism involved into looking into people's bags and the often corpse-like face peeking out from behind the out from behind the scattering of treasures, I found myself enthralled by the project and ended up submitting my own picture.

You can view the collection of images, as well as submit your own, at FaceYourPockets.com. There are also a few scanography groups on Flickr, like SCAN and one day in pandora box.

Here's mine, which seems to have turned out to be a bit of a testament to my immaturity. I won those little rubber fishes at Chuck E. Cheeses the other day.


If you make your own, let me know so I can check it out!

Experimental Crafting: The Quilt

Wednesday, September 15, 2010

My grandma, she quilts. She has a whole room for quilting. Her embroidery machine is so crazy that it has it's own operating system. Seriously, it runs Microsoft Windows.

So, I'm like, Hey, I'm a lot like my grandma, let's make a quilt.

So I did. Obviously. 'Cause I try to be the kind of person who follows through on what they say.


It was... kind of evil. Being generally pretty fabulous, I love the materials I picked out, and the general layout of the quilt. The white fabric was a bad choice and is just way too wrinkly. I had a ton of fun sewing together the little squares, but putting them together into one big quilt was a pain and no fun at all. Of course, after I was finished, my grandma decided to let me in on the secret that I could fully quilt the small squares, and then put the whole thing together after. Which she totally does herself. Thanks, Grandma.

The back is that super soft bumpy fabric that baby's love. Which, by the way, is not a good choice for quilting. But it's soft. And that's important because...


...the quilt was a gift for Peanut! I love you, Peanut~! Look how cute he is. Who cares that he already has like fifteen blankets that other people made for him? People who actually know what they're doing, no less. Besides the poo quality, this blanket is clearly the best thing he owns.

And it's extra special because it is the only quilt I will ever make ever. Screw quilting.


Today I have a guest post featured on Ramblings of a Singleton! You can read the story of my first love here.

Mess-Making

Tuesday, September 14, 2010

Some might say that I've been feeling... restless. Unaccomplished. Stir-crazy. I have no job, no children, and the home I live in isn't mine (housesitting, remember?) and so I have very little control over the place. (Less than I previously realized, but that's a story for another day.)

I've been working on channeling these feelings into something creative. These attempts usually involve the computer, simply because the magical Undo button keeps me from turning into a gurgling wad of frustration; however, these intangible creations have become less and less satisfying, and more and more mind-numbing. So much clicking, so little texture.

I've always wanted a "craft space." Basically, Poncho hates... stuff. If something is sitting on the table, then the room is a "mess." My computer desk, which has what a normal person would call glorious trinkets, Poncho calls a disaster. He is neat where I am... Well, I'm not messy, but, dammit, my stuff goes where it goes.

So I've been eyeballing other people's craft spaces and getting all envious. They're so full of stuff, and that stuff can be used to make other stuff. And that is awesome.

For posterity, here are a few of the craft spaces I've been eyeballing.

 
Little Miss Crafty has a lot of goodies.   |   Jessica at Shizuka Urusai believes in the power of cute.

Olivia at secretly loves pink is all about bright colors
and adorable yet geeky mascots.

 
Kristen, the Shabby Vintage Mom, has a lot of good vintage stores in her area, apparently.
Jen at the fabled needle has a cozy nook to relax and craft in. And beautiful flooring too!

So, if it's not obvious by now, I have moved a bunch of boxes and hollowed out my own craft space, so that I could fill it will stuff, and then use that stuff to make other stuff. And it is awesome.


That's right, I have turned a corner of Poncho's grandpa's office, with its walls of tweed, into a girl-zone. A girl-zone with an excessive amount of lamps.

And now I am happy.

Pandamonium

Tuesday, September 07, 2010

Excuse the bad pun. I have a weakness for them.


I also have a thing for panda bears. It doesn't really compare to my love affair with giraffes or strawberries, but they do bring me comfort like no fluffy thing can. I would sell three of my toes for a panda puppy.


Except that, y'know, bleaching the hell outta your dog and then rubbing black dye around his eyes probably isn't a great thing to do.

Anyway, I made this emoticon set for my LiveJournal... multiple years ago. I still like it, and so I'm sharing it.


Photobucket Photobucket Photobucket Photobucket Photobucket Photobucket Photobucket Photobucket Photobucket Photobucket Photobucket Photobucket
[ download them all ]

I'm also working on some other creative projects that I'm excited about. Reading reading the blogs of crafty people like Shabby Vintage Mom, Shizuka Urusai, Sunny Sweet Pea, and The Dainty Squid has given me an itch. Hopefully I will have something to show for it soon.
Related Posts Plugin for WordPress, Blogger...